Welcome to the HTML/JavaScript lesson page of the obniz Starter Kit!
In the last lesson, we checked if a button was pressed by dynamically changing the browser.
In this lesson, let's use the "distance sensor" from the parts to check if the distance is measured in the browser or on the obniz side.
How does the distance sensor work in the first place?
The distance sensor has an ultrasonic generator, which generates ultrasonic waves
When it hits an object, the sensor receives the reflected ultrasonic wave, and the time T(sec) that it took for the sound wave to travel can be determined.
Thus, from here the distance D can be,
D = T × 340(m/sec) ÷ 2
calculated by using the formula
If you know the principle, you know that you can prepare something that easily reflects ultrasonic waves (a flat object such as a plate) and measure the distance.
Now, as we have seen, there is a pageConnect the parts that explains each part of the Starter Kit, so Let's take a look at the HC-SR04 explanation page from the "Distance Sensor" link.
Now, if you look at this page
[await] measureWait()
It is the same as measure(), but this function returns promise
There is a function above.
Let's make a quick program using this as before.
(I have explained the principles and formulas, but in the end the library does all the calculations for you. It's very easy.)
If you are wondering, "What are await and promise?please look up "await promise javascript" in your browser.
In addition, the terms "synchronous processing and asynchronous processing" will probably come up, so if you look into that as well, you'll get a better understanding of how to program in JavaScript.
If you have difficulty understanding it, you may want to add or remove await in your obniz program to learn empirically how obniz works differently.
Write the program
As we have done in the previous articles, we just need to add a library for the distance sensor to the basic obniz program.
However, if we keep the sample as it is, we can only get the distance once, so we can use a loop statement to get the distance continuously.
Do you remember that the loop statement was previously used in the program Use Loop to move the servo motors alternately?
This time, I will use obniz.onloop.
Let's try to write as much as we can and then compare it with the program below.
(When I say "write," you can copy sentences from the library, or you can try to write them all yourself, at your own discretion!)
Are you all getting used to thinking and writing on your own by now?
<!-- HTML Example -->
<html>

<head>
    <!-- Load various preferences -->
    <meta name="viewport" content="width=device-width, initial-scale=1">
    <script src="https://obniz.com/js/jquery-3.2.1.min.js"></script>
    <script src="https://unpkg.com/[email protected]/obniz.js"></script>
</head>

<body>
    <script>
        //JavaScript starts here
  var obniz = new Obniz("OBNIZ_ID_HERE"); //Set your obniz ID.
    obniz.onconnect = async function () { //When obniz is connected...
    // Javascript Example
    const hcsr04 = obniz.wired("HC-SR04", {gnd:0, echo:1, trigger:2, vcc:3});
    obniz.onloop = async function(){
      let avg = 0;
      let count = 0;
      for (let i=0; i<3; i++) { // measure three time. and calculate average
        const val = await hcsr04.measureWait();
        if (val) {
          count++;
          avg += val;
        }
      }
      if (count > 1) {
        avg /= count;
      }
      console.log(avg);
      await obniz.wait(100);
    }
  };
    </script>
</body>

</html>
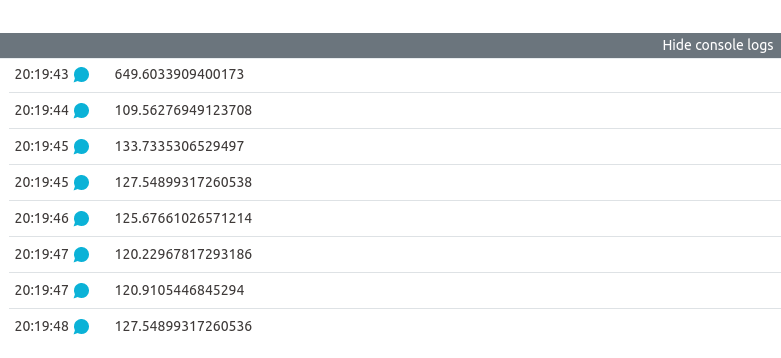
If you now open the console logs (the part that says "Show console logs"), you should see the following distances.
Well, that's it for this lesson... Hmmm... that's a little too much for us, so let's try combining it with other parts again!
In the next section, we'll use distance sensors and LED signals!
Let's try to make the distance visually obvious.
In the sample program we were running, the avg part averaged the distances measured several times (to reduce the variation of the distance sensor values).
console.log(avg);
I was able to see the distance with a program that displays a statement on the console screen called
So it would be good if we can change the behavior of the LED signal according to this distance.
So let's get to work on the items that will make that work!
It's important to note that...
・Declare the two parts properly so that they can be used.
→When you do this, change the pin numbers where the parts are connected.
・Create a variable called "distance" so that it can be used for both ultrasonic sensors and LED signals.
・Write conditional branching program statements such as if~else syntax to change the behavior of the LED signal depending on the distance.
We haven't mentioned the LED signals in the article yet, but you can use them yourself from the Connect the parts page!
If you can do this, you are now an intermediate user and can go to the parts page to see and use the program yourself!
Now that you have a grasp of the LED signals, let's write the program. Of course, if you have any questions, you can refer to the program below.
In the program below, the LED signals light up in order depending on the distance. It is up to you to decide which library function to use and how to make it behave.
It would also be interesting to have it glow randomly.
<!-- HTML Example -->
<html>

<head>
 <!-- 各種環境設定を読み込み -->
 <meta name="viewport" content="width=device-width, initial-scale=1">
 <script src="https://obniz.com/js/jquery-3.2.1.min.js"></script>
 <script src="https://unpkg.com/[email protected]/obniz.js"></script>
</head>

<body>
 <script> //JavaScript starts here
  var obniz = new Obniz("OBNIZ_ID_HERE"); //Set your obniz ID.
    obniz.onconnect = async function () { //When obniz connects...

        var hcsr04 = obniz.wired("HC-SR04", {gnd:0, echo:1, trigger:2, vcc:3});
        var light = obniz.wired("Keyestudio_TrafficLight", {gnd:4, green:5, yellow:6, red:7});

    obniz.onloop = async function(){
      let distance = 0;
      let count = 0;
      for (let i=0; i<3; i++) { // measure three time. and calculate average
        const val = await hcsr04.measureWait();
        if (val) {
          count++;
          distance += val;
        }
      }
      if (count > 1) {
        distance /= count;
      }
      console.log(distance);
            // await obniz.wait(100);
            if (distance < 50){
                light.single("red");
            }else if(distance <300){
                light.single("yellow");
            }else{
                light.single("green");
            }
    }
  };
 </script>
</body>

</html>
Now, when you run this (in my program), the LED signals will light up depending on the distance: near -> red, medium -> yellow, and far -> green.
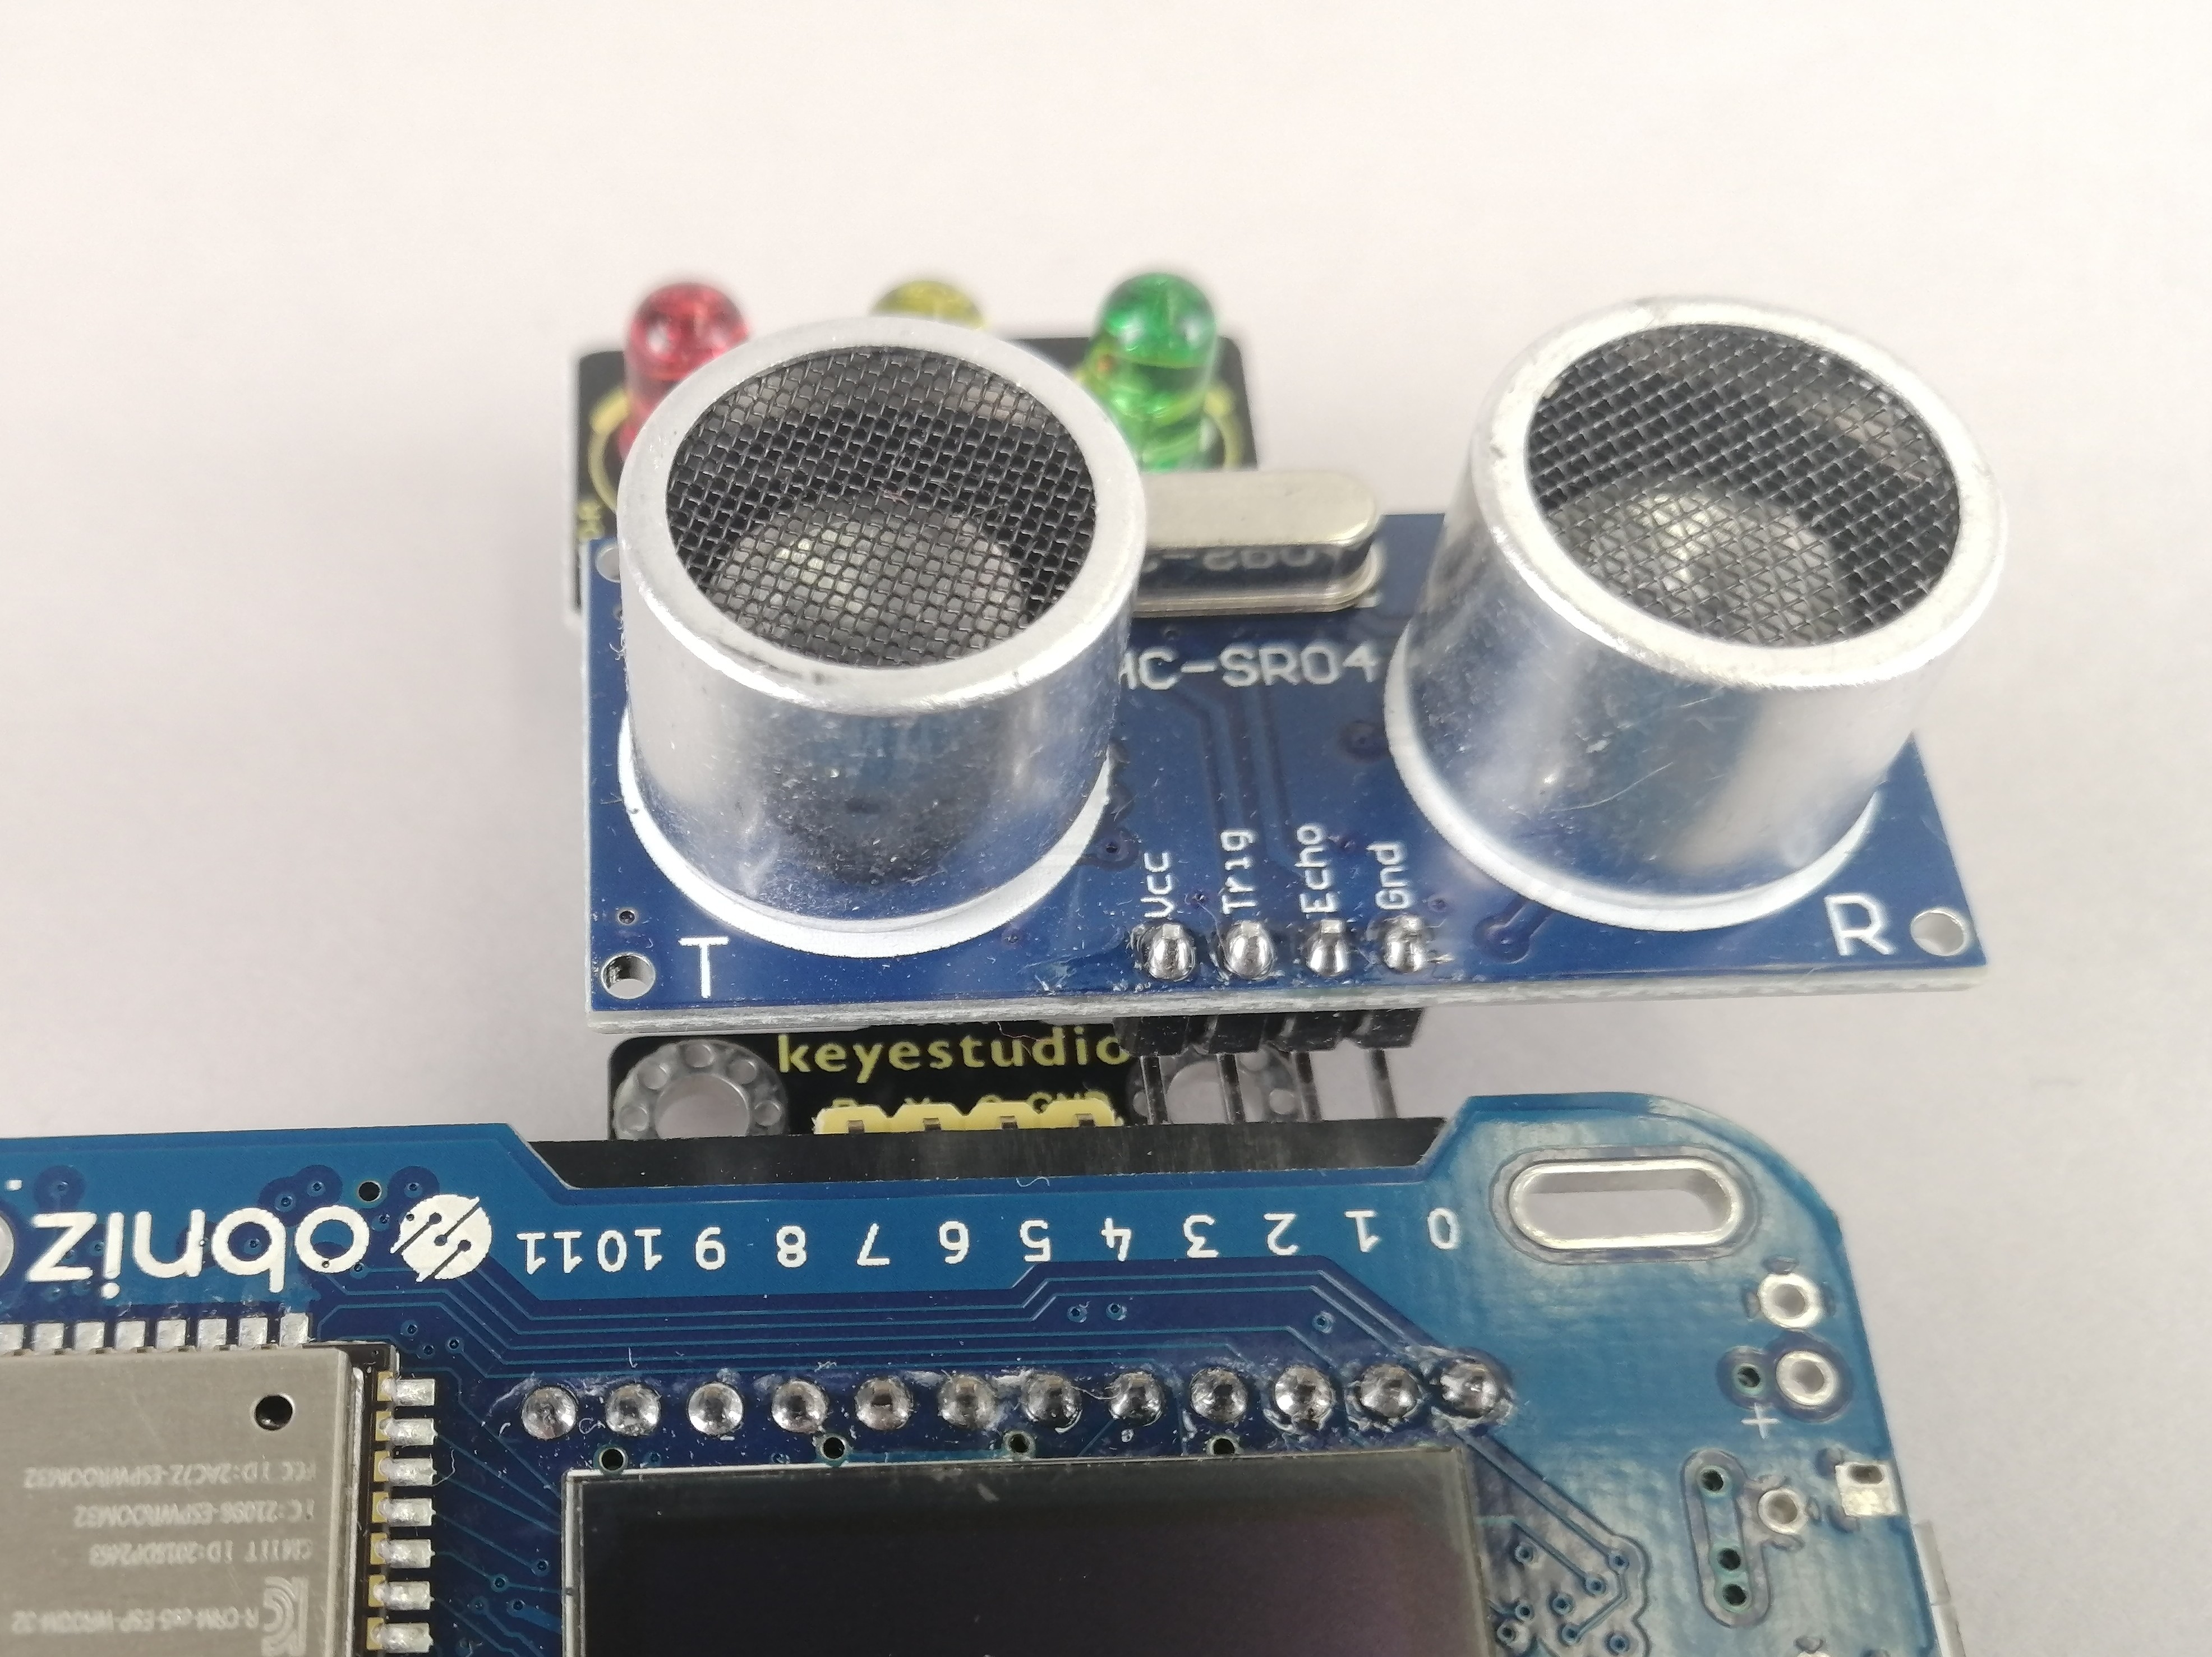
The parts are connected as shown in the picture below, distance sensor: 03 pins, LED signal: 47 pins.
If you look at the declaration part of obniz.wired(), you will see that it does indeed.
How did you make it behave? If it works the way you want it to, you've succeeded!
Please keep on modifying the samples in the article and writing programs from the beginning, and try various combinations of your own parts to make it work!
Development: Let's make a distance guessing game.
In this development, we will try to create a game using a distance sensor that can be played by any number of people.
For example, how about a game where you randomly choose a target distance value and guess it?
- In the program, randomly determine the distance.
- Insert the board in front of the distance sensor at the place where you think it should be.
The LED signal is lit according to the distance from the target value. (close -> red, medium -> yellow, far -> green, etc.) - After a few times of taking turns, if you win, congratulations!Turn on all the LEDs!
We will try to write this program based on the previous program.
As I said before, if you have an idea to make it more interesting,let's modify it!
<!-- HTML Example -->
<html>

<head>
 <!-- Load various preferences -->
 <meta name="viewport" content="width=device-width, initial-scale=1">
 <script src="https://obniz.com/js/jquery-3.2.1.min.js"></script>
 <script src="https://unpkg.com/[email protected]/obniz.js"></script>
</head>

<body>
 <script> //JavaScript starts here
  var obniz = new Obniz("OBNIZ_ID_HERE"); //Set your obniz ID.
    obniz.onconnect = async function () { //When obniz connects...

        var hcsr04 = obniz.wired("HC-SR04", {gnd:0, echo:1, trigger:2, vcc:3});
        var light = obniz.wired("Keyestudio_TrafficLight", {gnd:4, green:5, yellow:6, red:7});

    var min = 50 ;
    var max = 1000 ;
        let target_distance =  Math.floor( Math.random() * (max + 1 - min) ) + min ;    //Get a random number between min~max
    while(true) {
      let distance = 0;
            let count = 0;
      for (let i=0; i<3; i++) { // measure three time. and calculate average
        const val = await hcsr04.measureWait();
        if (val) {
          count++;
          distance += val;
        }
      }
      if (count > 1) {
        distance /= count;
      }
            let distance_diff = Math.abs(target_distance -distance);
      console.log("target_distance = " + target_distance + ", distance = " + distance + ", distance_diff = " + distance_diff);
            // await obniz.wait(100);
            if (distance_diff < 5){
        light.green.on();
        light.yellow.on();
        light.red.on();
      }else if (distance_diff < 50){
                light.single("red");
            }else if(distance_diff < 150){
                light.single("yellow");
            }else{
                light.single("green");
            }
    }
  };
 </script>
</body>

</html>