Hey everyone,Welcome to the HTML/JavaScript lesson page of the obniz Starter Kit!
In this lesson, you will learn how to use HTML/JavaScript in a browser, in last lessonworking,Let's try to move the servo motor!
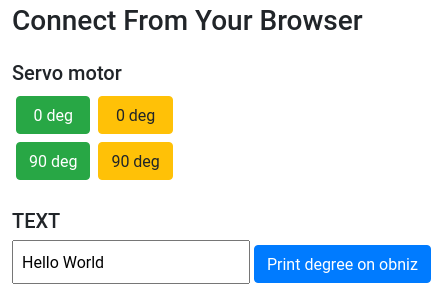
The goal is to create a UI that looks like the following and try to move the servo motors!
What is a browser?
Applications such as Microsoft Edge, Google Chrome, Mozilla Firefox, Safari, etc., which you usually use to watch Youtube or surf the web..
In fact, HTML/JavaScript is used by these browsers when they run, so you can use HTML/JavaScript to make pages that look like the ones you see on Youtube.(You have to study a lot to get to that level....)
In this article, we will use an existing program and modify it slightly to make it work easily.
Placing buttons in HTML
Did you look at Let's run the sample program?
Here, on the last page,I have a button on my browser that lights up an LED..
Let's make a button in the browser, just like this one.
For now, copy the program that runs the LED in the link above to an online editor.
When you run it, do you see an interface like the following?

(It's hard to write from the beginning,)we'd like to somehow incorporate this interface into the program we'll be using.
This is where the "Starter Kit Guide" [HTML/JavaScript Basics](https://obniz.com/ja/guides/obniz-starter-kit/start-guide/basic-of-html-and-javascript /) in the Starter Kit Guide will be helpful here.
If you read this site, you'll see that you can change the text in the HTML section, so let's change the relevant section while referring to this site.
You should see the text changes if you run the online editor yourself and try it a little at a time.
Practice 1
- Let's change the word "LED" to "Servo Motor" and the words on the button from "ON" and "OFF" to "0 deg" and "90 deg".
Hint: Where are the words "ON" and "OFF" located in the program?\
Run the program after making the changes, and if it looks like the following, it is successful.
Development 1 (You can proceed without doing this)
- In HTML/JavaScript Basics, there is a story about how to place ids.
In this HTML, IDs such asid="green_on"are placed, so you should change them to values that are easy for you to understand.
If you have changed it, please remember to rewrite the corresponding part in JavaScript later.
Did you get it? If you can't, please check the program at the end of the page.
Writing programs in JavaScript
By writing HTML, the "outside" of the interface is done.
But this was just a program to light up the LED, so I need to make a program to run the servo motor, right?
Since JavaScript is in charge of the movement, let's rewrite the part in <script></script>.
Let's run the sample program., the LED would turn on and off when you pressed a button on the browser. You can change that by using [last lesson](. /rotate-servo-motor.md) to make the servo motor move.
The flow of the change is as follows
- Change the LED library to a servo motor library.
- Set angle to change the rotation angle of the motor.
- Change the event that occurs when the button is pressed from lighting the LED to turning the servo motor.
Try to figure it out yourself first, and then look at the changes between <script></script> below.
Also, if you have just rewritten the ID of the text in development 1, don't forget to change the corresponding ID from '#green_on' etc. to the ID you have set.
    <script>
        var obniz = new Obniz("OBNIZ_ID_HERE");

        obniz.onconnect = async function () {

            // var light = obniz.wired("Keyestudio_TrafficLight", { gnd: 0, green: 1, yellow: 2, red: 3 });
            var servo = obniz.wired("ServoMotor", { gnd: 0, vcc: 1, signal: 2 });    //Set the servo motor library.
            var angle = 0;    //Zero degrees first.

            $('#green_on').click(function () {    //When the green "ON" button is pressed
                // light.green.on();
                angle = 0;    //Set the angle to 0 degrees.
                servo.angle(angle);    //Turn the servo motor to (angle) degrees.
            });

            $('#green_off').click(function () {    //When the green "OFF" button is pressed
                // light.green.off();
                angle = 90;    //Make the angle 90 degrees.
                servo.angle(angle);
            });

            $('#yellow_on').click(function () {    //When the yellow "ON" button is pressed
                // light.yellow.on();
                angle = angle + 5; //Set the angle to +5 degrees.
                servo.angle(angle);
            });

            $('#yellow_off').click(function () {//When the yellow "OFF" button is pressed
                // light.yellow.off();
                angle = angle - 5; //Set the angle to -5 degrees.
                servo.angle(angle);
            });

            obniz.switch.onchange = function (state) {
                $('#print').text(state);
                obniz.display.clear();
                obniz.display.print(state);
            }

            $("#showtime").on("click", function () {
                obniz.display.clear();
                // obniz.display.print($("#text").val());
                obniz.display.print(angle + " deg");
            });

        }

    </script>
Then you can run it in an online editor.
If the servo motor turns to the specified angle when you press the green button, you've succeeded!
(The movement of the yellow button is not implemented, so you can modify it by yourself to increase the angle.)
Development: Changing the display
Now, let's modify the display to show the current angle of the servo motor.
In the previous interface, there is a button to show "Hello World" on the obniz display, so let's change it.
HTML
First, let's delete the Hello World part and make the button look like the following.
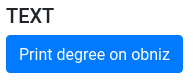
Rewrite the corresponding part of the button.
    <div>
        <!-- <input type="text" class="p-2" id="text" value="Hello World"> -->
        <!-- <button class="btn btn-primary" id="showtime">Print on obniz</button> -->
        <button class="btn btn-primary" id="showtime">Print degree on obniz</button>
    </div>
JavaScript
Rewrite the program part of the obniz display.
If you want to know how to use the display, please look at the Display page.
$("#showtime").on("click", function () {
    obniz.display.clear();
    // obniz.display.print($("#text").val());
    obniz.display.print(angle + " deg");
});
Press the button, and the current angle you set should appear on the obniz display as shown below.
That's it for this development!
In the next lesson, we'll combine a physical button, a servo motor, and a browser!
Completed version of the program
If this doesn't work for you, take a look at the following program and compare.
<html>

<head>
    <meta charset="utf-8">
    <meta name="viewport" content="width=device-width, initial-scale=1">
    <link rel="stylesheet" href="https://stackpath.bootstrapcdn.com/bootstrap/4.3.1/css/bootstrap.min.css">
    <script src="https://obniz.com/js/jquery-3.2.1.min.js"></script>
    <script src="https://unpkg.com/[email protected]/obniz.js"></script>
</head>

<body>

    <div id="obniz-debug"></div>

    <div class="wrap px-5 py-4">

        <h3 class="title mb-4">Connect From Your Browser</h3>

        <!-- <h5>LED</h5> -->
        <h5>Servo Motor</h5>

        <div class="btnBox d-flex mb-4">

            <div class="green_btn d-flex flex-column">
                <!-- <button class="btn btn-success m-1" id="green_on">ON</button>
                <button class="btn btn-success m-1" id="green_off">OFF</button> -->
                <button class="btn btn-success m-1" id="green_on">0 deg</button>
                <button class="btn btn-success m-1" id="green_off">90 deg</button>
            </div>

            <div class="yellow_btn d-flex flex-column">
                <!-- <button class="btn btn-warning m-1" id="yellow_on">ON</button>
                <button class="btn btn-warning m-1" id="yellow_off">OFF</button> -->
                <button class="btn btn-warning m-1" id="yellow_on">+5 deg</button>
                <button class="btn btn-warning m-1" id="yellow_off">-5 deg</button>
            </div>

        </div>

        <h5>TEXT</h5>

        <div>
            <!-- <input type="text" class="p-2" id="text" value="Hello World"> -->
            <!-- <button class="btn btn-primary" id="showtime">Print on obniz</button> -->
            <button class="btn btn-primary" id="showtime">Print degree on obniz</button>
        </div>

    </div>

    <script>
        var obniz = new Obniz("OBNIZ_ID_HERE");

        obniz.onconnect = async function () {

            // var light = obniz.wired("Keyestudio_TrafficLight", { gnd: 0, green: 1, yellow: 2, red: 3 });
            var servo = obniz.wired("ServoMotor", { gnd: 0, vcc: 1, signal: 2 });    //Sst the servo motor library.
            var angle = 0;    //Zero degrees first.

            $('#green_on').click(function () {    //When the green "ON" button is pressed
                // light.green.on();
                angle = 0;    //Set the angle to 0 degrees.
                servo.angle(angle);    //Turn the servo motor to (angle) degrees.
            });

            $('#green_off').click(function () {    //When the green "OFF" button is pressed
                // light.green.off();
                angle = 90;    //Set the angle to 90 degrees.
                servo.angle(angle);
            });

            $('#yellow_on').click(function () {    //When the yellow "ON" button is pressed
                // light.yellow.on();
                angle = angle + 5; //Set the angle to +5 degrees.
                servo.angle(angle);
            });

            $('#yellow_off').click(function () {//When the yellow "OFF" button is pressed
                // light.yellow.off();
                angle = angle - 5; //Set the angle to -5 degrees.
                servo.angle(angle);
            });

            obniz.switch.onchange = function (state) {
                $('#print').text(state);
                obniz.display.clear();
                obniz.display.print(state);
            }

            $("#showtime").on("click", function () {
                obniz.display.clear();
                // obniz.display.print($("#text").val());
                obniz.display.print(angle + " deg");
            });

        }

    </script>
</body>

</html>