This quick start shows how to start M5StickC.
Please prepare M5StickC and cable, Smartphone(or PC) and Portable Battery Pack or AC Adaptor.
Step1. Start M5StickC
Press right bottom tiny button(power button) to power up. Charge M5StickC before use or stay connected to power supply by USB cable.
Step2. Connect Wi-Fi
When not Wi-Fi configured yet, you will see Wi-Fi setting screen on your device. See and follow below document to setup Wi-Fi. Prepare smartphone or Laptop to connect Wi-Fi from M5StickC to configure Wi-Fi setting on your browser.
If an error is displayed or startup is not possible → See Troubleshooting.
Step3. Run the program
Please read the QR code displayed on the obniz Board with your smartphone. The program editor will open.
Using PC
Please open the Program editor. When prompted for obnizID, please enter your obnizID (the 8-digit number displayed on your obniz Board).
Tap (click) [Run] at the top right of the screen to open the run screen and run the program.
In the initial state, character input and LED ON / OFF buttons are displayed and be used. And Press “M5” button on your device then text on browser will be changed.
The program ends by closing the execution screen.
How to use obniz.js
In obniz.js 3.4.0 or later, if you specify Obniz.M5StickC(), you can use the Easily call up M5StickC functions and IO without being aware of them.
Easy to use buttons, grooves and sensors.
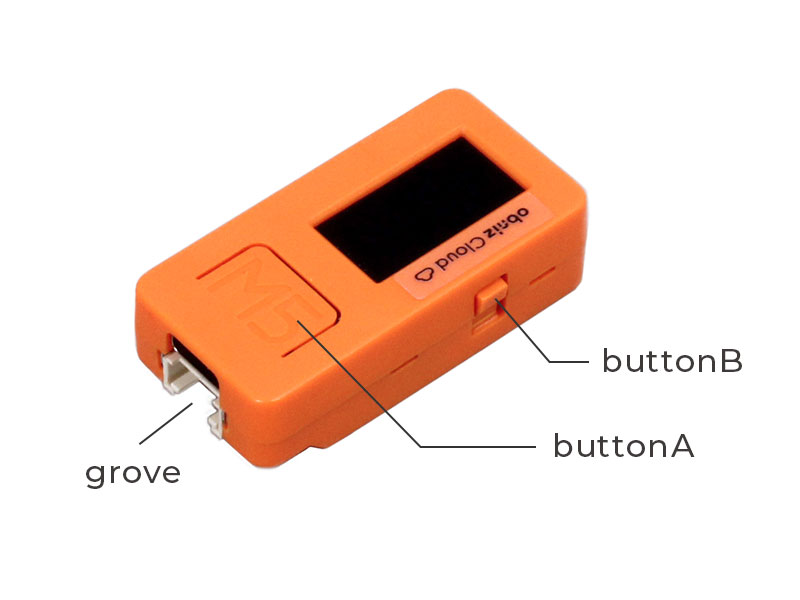
Buttons
let obniz = new Obniz.M5StickC("OBNIZ_ID");
obniz.onconnect = async () => {
    obniz.buttonA.onchange = (flg)=>{
        console.log(`buttonA state : ${flg}`);
    };
}
Grove
let obniz = new Obniz.M5StickC("OBNIZ_ID");
obniz.onconnect = async () => {
    const speaker = obniz.wired("Grove_Speaker", { grove: obniz.grove0});
    speaker.play(1000); //1000hz
    await obniz.wait(1000);
    speaker.stop();
}
Sensors
let obniz = new Obniz.M5StickC("OBNIZ_ID");
obniz.onconnect = async () => {
    await obniz.setupIMUWait();
    // or old m5stickC
    // await obniz.setupIMUWait("SH200Q");
    console.log( await obniz.accelerationWait() ); console.log( await obniz.giroWait() )
    console.log( await obniz.giroWait() )
}
let obniz = new Obniz.M5StickC("OBNIZ_ID");
obniz.onconnect = async () => {
    // LED blink
    obniz.led.blink();
    // IR LED TV and other remote controls can be created. It can only send.
    // The data from the remote control needs to be analyzed up front using another sensor.
    // https://obniz.com/sdk/parts/IRSensor/README.md
    // Send the analyzed data in an array.
    obniz.ir.send([1,1,1,1]);
}
Step4. Power off M5StickC
Long-Press power button over 5sec.
Registering devices to the cloud
You can register devices in the cloud by going to Register device.
Registering to the cloud allows you to increase the level of security and manage your devices at a glance