When you write, you will need two obniz devices.
The configuration is that two obniz devices relay the writing of arduino.
Hardware Configuration.
.png)
Let's take a look at how to connect specifically.
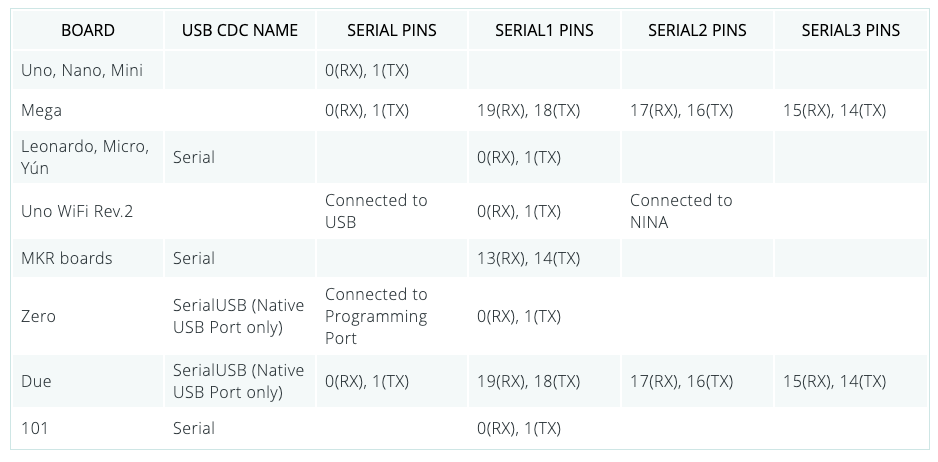
https://www.arduino.cc/reference/en/language/functions/communication/serial/
Use these SERIAL PINS (pins to connect to the PC for writing).
Connect the arduino serial to the obniz.
VCC, GND, RX and TX are required.
Write Program.
Arudino uses UART for both program writing and serial log.
If you use arudino's UART, you will be able to complete writing.
Connect the arduino's obniz device and the PC's obniz device.
For writing, we need to reset the device at the start of communication, so we'll add that too.
var obnizA = new Obniz("OBNIZ ID HERE"); //PC-side obniz
obnizA.onconnect = async function () {
  var obnizB = new Obniz("OBNIZ ID HERE"); //Arduino -side obniz
  obnizB.onconnect = async function(){
    var baud = 115200; // configration for UNO
    obnizA.uart0.start({tx: 0, rx: 1, baud:baud }); obnizB.uart0.start({tx: 0, rx: 1, baud:baud }); obnizB.uart0.start({tx: 0, rx: 1, baud:baud });
    obnizB.uart0.start({tx: 0, rx: 1, baud:baud }); // obnizB.uart0.start({tx: 0, rx: 1, baud:baud }); // obnizA.io3.output(false);
    obnizA.io3.output(false); //USB-UART GND
    obnizB.io4.output(true); //Arduino Power
    obnizB.io3.output(false); //Arduino GND
    obnizB.io2.output(true); //DTR(Arduino Reset)

    //Arduino GND
    $("#on").click(function(){
      obnizB.io3.output(false);
    })
    $("#off").click(function(){
      obnizB.io3.output(true);
    })

    var lastTime = new Date().getTime();
    obnizA.uart0.onreceive = async function(data, text) {
      // PC to arduino
      obnizB.uart0.send(data);

      // automatic reset to turn arduino to upload-mode
      var now = new Date().getTime();
      if (now - lastTime > 1000){
        obnizB.io2.output(false);
        obnizB.wait(10);
        obnizB.io2.output(true);
      }
      lastTime = new Date().getTime();
    }

    obnizB.uart0.onreceive = async function(data, text) {
      // arduino to pc
      obnizA.uart0.send(data);
    }
  }
}
As a point of caution, you need to match the communication speed.
This time, you will find some communication speeds.
.png)
The var baud = 115200; written on the obniz side is the two blue balloons BaudRate.
Each device has its own baud rate that can be used for writing, so you must use the Yes.
The yellow balloon on the Arduino side and the orange balloon on the PC side are fixed to each device. For example
For example, the speed is as follows
- arduino UNO : 115200
- arduino Pro : 57600
To find out how fast other boards write, here's a good place to start.
https://github.com/Optiboot/optiboot/blob/master/optiboot/boards.txt