You can connect to the Wi-Fi that the obniz device puts out from your PC/smartphone and configure the settings from your browser.
## How to connect to the Wi-Fi put out by the device
The device does not put out Wi-Fi at any time, but will be in setting mode under the following conditions.
OS | How to change the setting mode | Setting screen
---|---|---
3.5.0 <= | - Press and hold the button at startup (or immediately after)
- If unable to connect to any of the stored network settings | Automatically opens after connection. If it will not be opened, open browser and type `http://192.168.254.1/`
< 3.5.0 | - Press and hold the button at startup (or immediately after) to open `http://192.168.0.1/` in your browser if it cannot connect to any of the saved network settings.
< 3.0.2 | - Press and hold the button at startup (or immediately after)
- If none of the stored network settings can be connected, open `http://1.2.3.4/` in the browser
On obniz Board / obniz Board 1Y with OS7.1.0 and later, press and hold the dial at any time to enter setting mode, as on other products. The SSID to connect to is shown on the screen.
Once in configuration mode, the obniz device will output a password-free Wi-Fi with the following SSID from itself.
```
obniz-XXXXXXXX
```
(XXXXXXXXX is the obnizID of the device)
Connecting with a smartphone or PC will automatically launch a browser (OS 3.5.0 or later). If your browser does not open, or if you have an older OS, open the URL described in above table.
## Login
> OS3.5.0 or later
PassKey is required to login to the configuration page. The factory default setting is `obniz`, which can be changed via browser or cloud after login (contact us for changing from cloud).

## Network selection
> OS3.5.0 or later
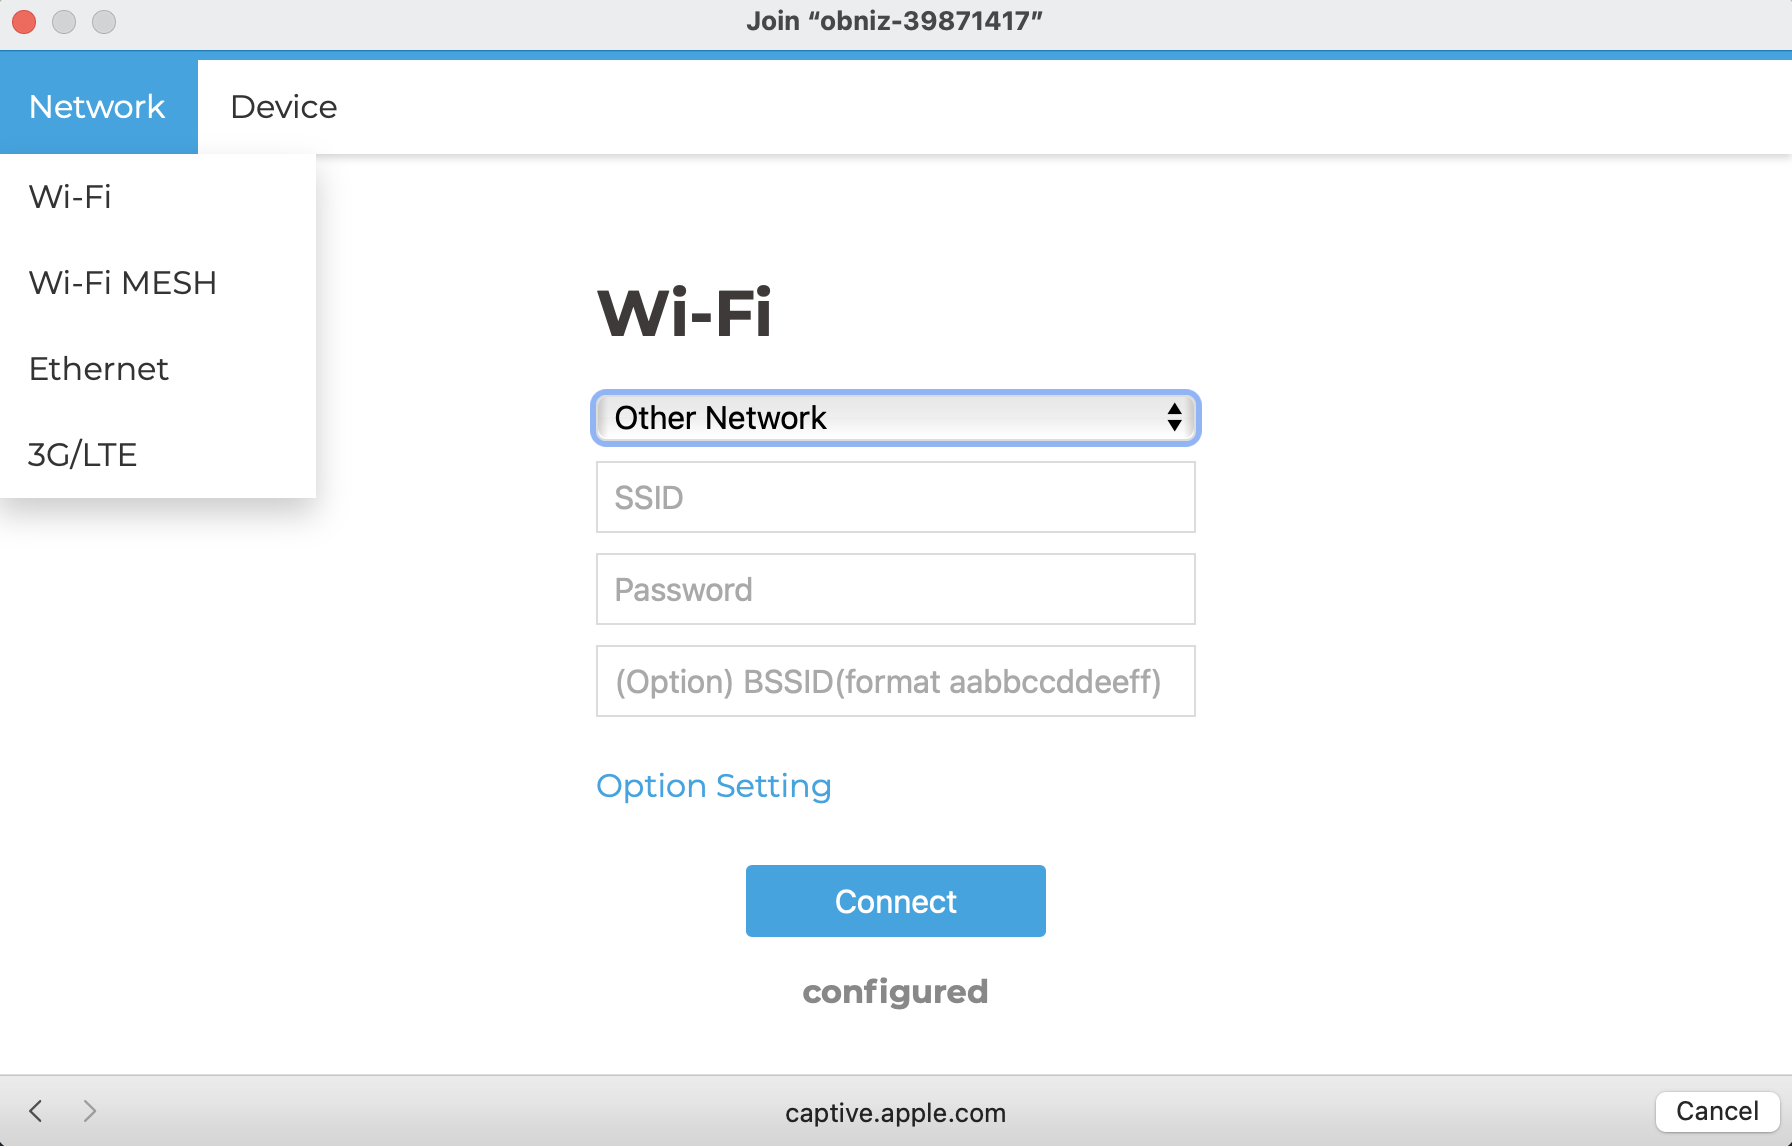
After logging in, the following Wi-Fi setting screen will open on your smartphone or PC.
No matter what device you are using, the Wi-Fi settings screen will always open first, regardless of your current settings.
If you want to use a different setting, please select the desired network from "Network" in the upper left corner.

The behavior of the settings screen may differ depending on the browser specifications.
[For Andoroid users](https://support.obniz.com/hc/ja/articles/9765471641113-%E3%83%8D%E3%83%83%E3%83%88%E3%83%AF%E3%83%BC%E3%82%AF%E8%A8%AD%E5%AE%9A%E7%94%BB%E9%9D%A2%E3%81%A7connect%E5%AE%9F%E8%A1%8C%E5%BE%8C-%E8%A8%AD%E5%AE%9A%E3%81%AE%E7%B5%90%E6%9E%9C%E3%82%92%E7%A2%BA%E8%AA%8D%E3%81%99%E3%82%8B%E5%89%8D%E3%81%AB%E3%83%96%E3%83%A9%E3%82%A6%E3%82%B6%E3%81%8C%E9%96%89%E3%81%98%E3%82%8B-Android%E3%81%A7%E9%96%8B%E3%81%84%E3%81%9F%E5%A0%B4%E5%90%88-)
## Network settings
You can configure all the network settings of obnizOS from your browser.
For details on what to save, see [Top page of settings](./). There are descriptions about multiple settings and priority.
### Display connection status
> OS3.5.0 or later
From OS3.5.0, you can check the connection status after setting with a browser.
Network | After Setting
---|---
Wi-Fi | Pressing the Wi-Fi connect button will save the settings and display the connection status. In case of failure, an error message will be displayed and you will be able to set up again.
Ethernet | Pressing the Ethernet button will save the settings and the device will reboot and try to connect after rebooting.
Cellular | Pressing the Cellular button will save the settings and display the connection status. In case of failure, an error message will be displayed and you will be able to configure the settings again, and in case of success, the device will go online and reboot once.
The following is an example of what will be displayed as the connection status.
Network | Status | Description
---|---|---
Wi-Fi | setting_configured | configured or waiting for configuration
_ | wifi_connecting | connecting to Wi-Fi
_ | wifi_waiting_dhcp | inquiring about DHCP
_ | net_resolving_dns | DNS name resolution in progress
_ | net_tcp_connecting | connecting to cloud
_ | net_tcp_sending | requesting cloud connection
_ | net_tcp_waiting_response | waiting for cloud connection request approval
_ | online | online
Ethernet | setting_configured | configured or waiting for configuration
Cellular | setting_configured | configured or waiting for configuration
_ | lte_initing | initializing modem
Ethernet | setting_configured | waiting for setting or configuration
_ | net_resolving_dns | DNS name resolution
_ | net_tcp_connecting | connecting to the cloud
_ | net_tcp_sending | requesting cloud connection
_ | net_tcp_waiting_response | waiting for cloud connection request approval
_ | online | online
### Wi-Fi Settings
The Wi-Fi Settings page scans for nearby Wi-Fi and displays the choices as you view them.
The following items can be set.
Settings|Required | Contents
---|---|---
SSID/Password | required | minimum required to connect, if SSID is not in the list, you can select "Other Network" and enter it.
BSSID | Not required | Used for connection with a Mac address. Use 12 alphanumeric characters.
Fixed IP | Not required | Specify a fixed IP, subnet, DNS, or Gateway. Leaving it blank will use DHCP.
Proxy | not required |Specify port and address to use Proxy for Websocket connection.
WPA2 Enterprise | not required | Specify Username, Password and AnonymousID
Pressing Connect will immediately save the settings and start the connection. While the connection is in progress, the progress status will be displayed below the button.
If the connection is successful, the device will reboot once.
If the connection fails, the error message will be displayed.
Save up to 5 entries.
### Ethernet Settings
Save the wired LAN settings.
Settings|Required | Description
---|---|---
Fixed IP | Not Required | Specify a fixed IP, subnet, DNS, or Gateway. Leave this blank to use DHCP.
Proxy | not required |Specify port and address to use Proxy for Websocket connection.
Unlike Wi-Fi settings, pressing Connect will save the settings and reboot immediately.
### LTE Settings
> OS3.5.0 or later
Save the SIM settings for the modem.
Settings|Required | Description
---|---|---
APN Settings | Required | APN, id, password
Press Connect to save the settings immediately and start the connection. While connecting, the progress will be displayed below the button.
If the connection is successful, the device will reboot once.
If the connection fails, the error message will be displayed.
## Display device information and settings
By selecting `Device` from the top navigation, you can delete settings and check the Mac address.
The available settings are as follows.
Settings | Contents
---|---
Delete network settings | Delete all network settings
Wi-Fi Region | Set available channels granted by goverment. By default, it is set to `North America (1-11ch)`. It measn obnizOS only scan actively only 1-11 and passively 12-14ch. Especially for Hidden SSID, obnizOS never find hidden SSID on 12-14ch.
PassKey | Set the password for login. If you set this, you will not be able to login with `obniz`.
## Batch Configuration via JSON
> For OS7 and later
You can configure all settings at once using a [Configuration JSON](./setting-json).
By entering a single JSON string, you can set up everything from Wi-Fi credentials to self-hosting configurations in one go.
